Poynt device instructions
Table of Contents
Logging in to Retail Time POS on Poynt
Receipt and Kitchen Printer Setup on Poynt
Built-in Bar Code Scanner Usage on Poynt Smart Terminal
Poynt setup and activation
Step 1: Placing the Device
There are two screens - the bigger one should face you and the smaller is directed at customers.

When connecting a strong, private WiFi connection you have the freedom to place your device wherever you’d like to transact. If connecting with secure ethernet, the device will need to be placed on the docking station within reach of your ethernet cord.
Step 2: Power On
To turn on your device, press and hold the power button behind the merchant screen for 3 seconds.
When placing your terminal on the dock make sure that both Poynt logos are facing you, aligning the terminal with the charging pins. Your device will charge while on the dock. We recommend fully charging the device (approximately one hour) before initial use.
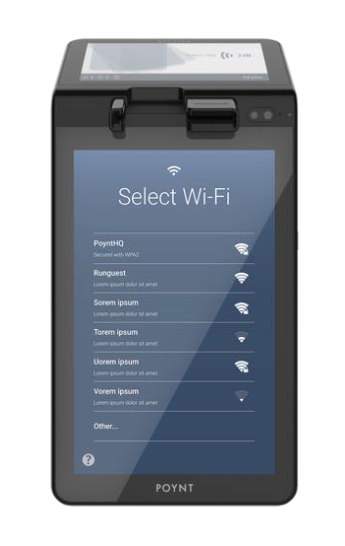
Step 3: Connect
Your device will walk you through connecting to the internet via WiFi the first time you turn it on. To connect via Ethernet instead, simply plug your cord into the back of the dock.
After connecting, it may begin to update its software as required. This can take a few minutes. Allow the device to download, install, and reboot before getting started.
Step 4: Activate
Now it’s time to activate your Smart Terminal, which links your device to your bank.
Note: Activation procedure varies depending on your reseller. You will receive instructions on the best way to activate from your sales representative.
Step 5: Scan your QR code or select PRocessor
After powering on and connecting to the internet, click the link and following the on-screen instructions for Scanning a QR code from your Welcome Email. Doing this will link your unique Smart Terminal with your Poynt Web Portal account and payment processor information.
Manually add processor: select processor, TSYS, FirstData, then enter MID and TID
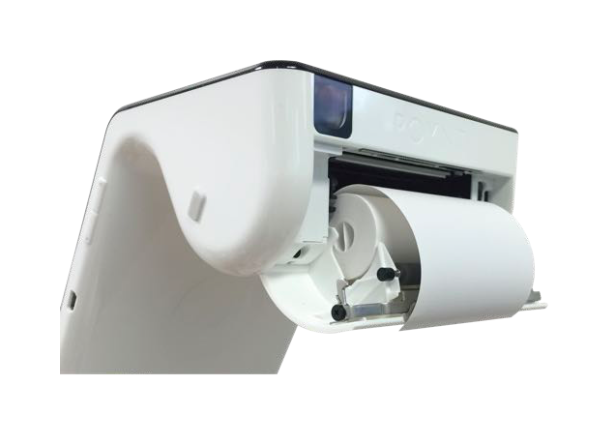
Step 6: Load Paper
To load a fresh roll of receipt paper into your device, lift the latch on the printer compartment and pull out. This will release the latch. Unwrap the roll of paper, make sure that the paper is taut to the roll and place the roll into the printer compartment. The edge of the paper should be oriented toward the top of the roll to ensure the receipt prints properly.
After these steps, you are ready to start accepting payments!
Logging in to Retail time POS on Poynt
- Turn the device on and start the Retail Time application, which is already installed.
- On the login screen, input your Account ID and License Key (which was provided in your Welcome to Retail Time email).
- On the next screen, input your PIN number (which was also provided in your Welcome email).
Receipt and Kitchen Printer Setup on Poynt
Overview
For a Receipt Printer or Kitchen Receipt Printer, you can use either the built-in Poynt printer, the Star TSP 100 LAN Printer, or a BTP-R180II printer.
Requirements
- Must have at least Freedom Package
- Must have selected Poynt from Payment Gateway drop-down menu in Register Settings of Back Office.
Instructions
1. Turn On Poynt Terminal
- Input power source cord into the Poynt terminal and fully charge it.
- Turn Poynt device on. The built-in equipment is already setup and is ready to use.
- Set the wifi on the Poynt device to the same network that the Star Printer is connected to.
- On the back of the printer, input the printer power source cord into the leftmost plug-in and plug it into to an outlet.
- Input the ethernet router into the rightmost plug-in on the back of the printer and to an outlet.
- Turn printer on by pushing down the "l" on the side of the printer.
- On Poynt terminal, log in to RetailTime POS
- In the left navigation menu, tap on Settings--->Printer Setup
- On Printer Settings screen, tap Search for printer on the top right.
- The printer you are using should show up under both Receipt Printers and Kitchen Printers. Check off the box(es) of whichever one(s) you would like to set up your printer to print.
Note: For kitchen receipts to print, you must select the Kitchen Receipt option in the Receipt tab of your Back Office Store Settings.
- Choose either 80mm or 58mm as the paper width for both printer types.
- The option Print Test Page will appear to the right of the printer. Tap it to print a test page to ensure that the printer is set up properly.
- Confirm your printer settings by tapping the DONE button. The printer should now be set up to work on your Poynt device.
Credit Card Payments on Poynt
Overview
- Processing credit card payments is different for Poynt than for the other devices.
- You will need to set up Poynt as payment processor in Back Office.
Requirements
- Poynt must be set up as your payment processor in Back Office.
- Must have installed the Credit/Debit POS Integration app in the Back Office App Directory.
- Credit card payments are only available when online.
- Can only be performed by Administrator, Manager, and Salesperson employee roles
- After selecting one or more product(s) in the catalog, click on the green All Payments button on the bottom left of the screen.
- Select Credit Card as the payment method.
3. On the Credit Card Payment screen, you can choose to either swipe the card on the terminal or enter the card info manually. If you wish to Enter card manually, select that switch so it turns green. If not, leave it as seen below.
4. Input whether you want the Tips & Signature to appear On Receipt, On Screen (main screen), or On Terminal (small screen) by selecting the proffered box.
Note: If the EBT app is installed, only signatures will be enabled and not tips. If the Tips & signature on POS shown: box is not checked on the Tips tab in Back Office Store Settings, neither tips nor signature will be enabled and the sections will not appear.
- Tap the PROCESS button.
- If the On Receipt option was selected, enter the tip amount after the order is processed on the Tips page on POS, accessed from the left navigation menu and then close the batch.
- If the On Screen option was selected, it will take you to the Tips screen, where you can enter the tip amount on the calculator, selecting to input it as either a percentage or currency amount.
Note: Before closing the register you have to close all orders with tips. To make it go to Tips tab.
You can scroll right to see Tips field. In this field enter tips amount received.
Then you have to pick out order(s) and select Save orders.
Select all orders, choose Close Orders and confirm this action.
6A. If Selected to Enter Card Manually:
- Enter the credit card details as shown in the screen below and then tap the CHARGE button
- If the card info is valid, a pop up will appear saying it was processed successfully. Click OK
6B. If Did Not Select to Enter Card Manually:
- Insert the credit card into the card slot of your Poynt device.
- Poynt will take a few moments to process the credit card. After, a prompt will ask for the customer's signature in the chosen method from the above screen.
- On the Receipt screen, choose the Receipt language by selecting it from the drop-down.
- Choose to either Email receipt or Print receipt by tapping the switch to the right of the option (if selected, will appear as blue).
- If the Print Receipt option was turned off for a transaction, it will be turned off by default for future transactions until it is turned on again for another transaction.
- You also have the option to Print kitchen receipt if enabled for one of the products in the order in the Products section of Back Office.
- If you selected Email receipt, you will have the option to create the customer in the system, saving his email address, name, and order information. To do this, select the Add new customer? switch so it turns green and then you will have the ability to enter his First Name and Last Name.
Note: this option will not be available if a customer was already selected for the order.
- If you purchased the Marketing & Loyalty app, you can perform a Loyalty Check-In for the customer by tapping the switch (will appear green when on).
- Tap the DONE button.
- If you chose the option of printing the receipt, it will print from the printer set up in Printer Setup.
Split Payments on Poynt
Requirements
- Can only be performed by Administrator, Manager, and Salesperson employee roles.
- Can only use credit card as split payment option if installed Credit/Debit POS Integration Otherwise, can use credit card as part of external payment option.
- Must be online to use credit card as option.
- Debit Card is not an option for Split Payments.
Instructions
- After selecting one or more product(s) in the catalog, click on the green All Payments button on the bottom left of the screen.
- Select Split Payment as the payment method.
- On the Split Payment screen, select the number of individual payments for the order by tapping the + or - sign until you get to that number. The default will be set at 2.
- For each individual payment, a row will appear. Select the payment type for each payment by tapping the down arrow on each row and then selecting the preferred option for each.
- By default the cost will be split evenly across all payments. You can edit the cost for each payment by inputting the cursor where the $ amount is and entering the desired amount.
- The sum of all amounts must be = to the total sales price of order. It will update the other amounts automatically to make them = to the total sales price.
- Select the Charge button next to each payment row to charge each individual payment by their selected payment option.
- After each payment is processed, you will return to the Split Payment screen, where you can select to charge another payment.
- A check mark will appear in each successfully processed row and you will have the option to Void each processed payment.
- After all payments have been charged and you moved back to the Split Payment screen, select the PROCESS button.
- On the Receipt screen, choose the Receipt language by selecting it from the drop-down.
- Choose to either Email receipt or Print receipt by tapping the switch to the right of the option (if selected, will appear as blue).
- If the Print Receipt option was turned off for a transaction, it will be turned off by default for future transactions until it is turned on again for another transaction.
- You also have the option to Print kitchen receipt if enabled for one of the products in the order in the Products section of Back Office.
- If you selected Email receipt, you will have the option to create the customer in the system, saving his email address, name, and order information. To do this, select the Add new customer? switch so it turns green and then you will have the ability to enter his First Name and Last Name.
Note: this option will not be available if a customer was already selected for the order.
- If you purchased the Marketing & Loyalty app, you can perform a Loyalty Check-In for the customer by tapping the switch (will appear green when on).
- If the amount tendered is larger than the amount due, the Change due will be displayed.
- Click the DONE button.
Built-in Bar Code Scanner Usage on Poynt Smart Terminal
Overview
You can use Poynt's built-in barcode scanner to scan barcodes of items.
Instructions
- Tap the Scan button on the top right of the shopping cart.
- Focus on the camera of the Poynt device on the barcode. Once the barcode is captured by the camera, it will take a few seconds to scan it.
Related Articles
Built-in Poynt Smart Terminal Printer Setup
Overview When using Poynt with eHopper, you can set the built-in receipt printer on the Poynt device to print receipts. Requirements Must have Credit/Debit POS Integration app installed in Back Office. To get the app please contact ...Credit Card Payments on Poynt
Overview Processing credit card payments is different for Poynt than for the other devices. You will need to set up Poynt as a payment gateway in Back Office > Store settings. Requirements Poynt must be set up as your payment processor in Back ...Built-in Bar Code Scanner Usage on Poynt Terminal
Overview You can use the Poynt 5 built-in barcode scanner to scan barcodes of items with RetailTime app. Instructions 1. Tap the Scan button on the top right of the shopping cart. 2. Focus on the camera of the Poynt device on the barcode. Once the ...Receipt and Kitchen Printer Setup on Poynt
Overview For a Receipt Printer or Kitchen Receipt Printer, you can use either the built-in Poynt printer, the Star TSP 100 LAN Printer, or a BTP-R180II printer. Requirements Must have selected Poynt from Payment Gateway drop-down menu in Store ...Star TSP100 LAN Printer Setup on Poynt Terminal
Overview Before you can use the Star TSP100 Printer on your Poynt device, you will have to configure it and set it up with RetailTime app. Requirements Must have Credit/Debit POS Integration app installed in Back Office. To get the app please ...